Using a Free Webhosting Service to Host Images
Jun 30, 2017 14:36:56 GMT
tomiseksj, Ryan, and 2 more like this
Post by PostmasterGS on Jun 30, 2017 14:36:56 GMT
In light of the problems with free image hosting services (Imgur, Photobucket, etc.), here's a tutorial on how to use a free webhosting service to host your images. A few caveats:
1. Many of the services which are advertised as having free unlimited storage and bandwidth aren't actually free. They heave limited free services, but charge (usually $5-$15/month) for the unlimited plans. Poke around their websites and have a good look at the services offered before signing up for anything.
2. As with anything that's "free," services are subject to change (see Photobucket). If you truly want a stable, long-term solution, investing in a "premium " service (again, $5-$15/mo) will probably guarantee better long-term stability. I've had the same $11/mo unlimited service (Hostingmatters.com) for 15 years without a price increase or change in service.
3. Setup details will vary across platforms, so this is just a general guide. If you have any specific problems, let me know and I'll see what I can do to help.
4. I'm not affiliated with the hosting service demonstrated here, and offer no opinion as to their stability, reliability, adherence to "free," etc. Again, do your homework before signing up for anything. Perhaps when I get time I'll do some additional research and make a specific webhost recommendation, but for now, YMMV.
So let's get started.
Requirements
Most webhosting services will offer you two options for uploading images -- (1) web-based or (2) FTP (File Transfer Protocol).
1. If you're going to use web-based, no additional software is required as you can upload images within your browser.
2. If you're going to use FTP, you'll need an FTP client. On my Mac, I use YummyFTP or Fetch. For Windows, I've used FileZilla and WS_FTP. If you're going to be uploading lots of images, I recommend FTP. It's a million times faster and easier once you get past the initial setup.
Setting up a webhosting account
For this demo, I'll be using x10Hosting. Again, no endorsement implied. As far as I can tell, their free plan has unlimited storage. Not sure on the bandwidth, but even if it's limited, if all you're doing is hosting stamp images, you won't run into any bandwidth problems.
1. Create an account. The address you enter here will be the address of your "website". For this example, I used pmgs.x10host.com.

2. I can't show the intermediate steps to setting up an account for account security reasons, but once you're done, you should be at a Control panel that looks like this.
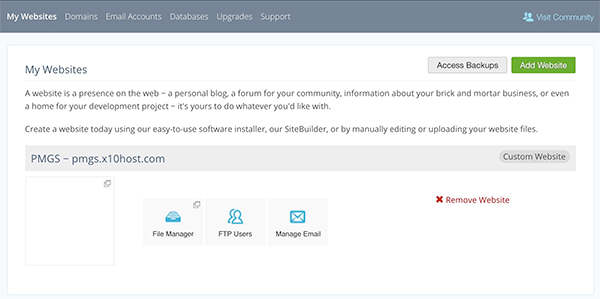
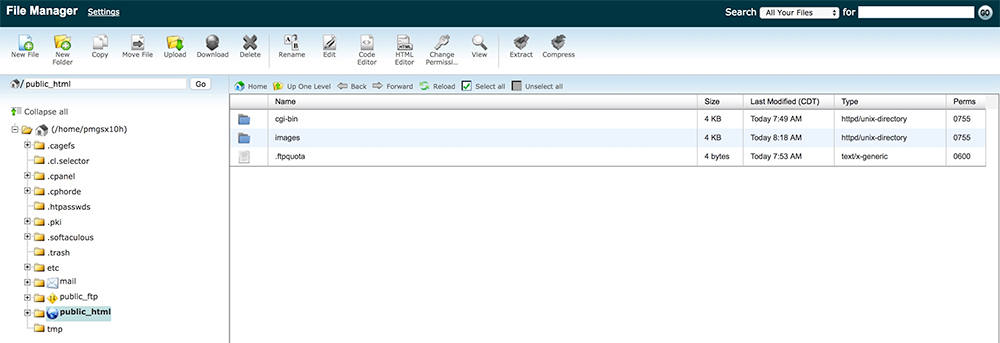
3. Web-based uploads: If you just want to upload images via your web browser, click on File Manager to get to this screen. The public_html folder in the tree at left is your root folder. This should always be your starting place. Within that folder, you can create subfolders if you'd like. For example, I created a subfolder called images, and because I keep my images from various stamp forums separate, under images I created additional subfolders for tsf, sbears, scf. For this example, I clicked the Upload button and uploaded an image to my /images/tsf subfolder.
If you're not going to connect via FTP, skip to Step 9.
4. FTP uploads: If you want to upload images via FTP, from the Control Panel, click on FTP Users. You'll get a screen with this button -- click it.

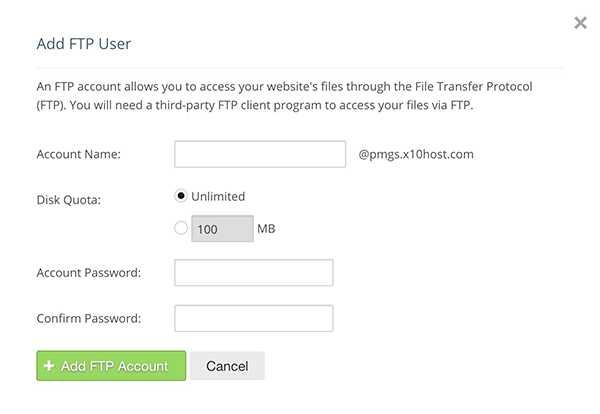
5. You'll then get the screen to add an FTP user. This allows you to create a username and password which you'll use to login through your FTP client. For this demo, I used pmgs@pmgs.x10host.com.
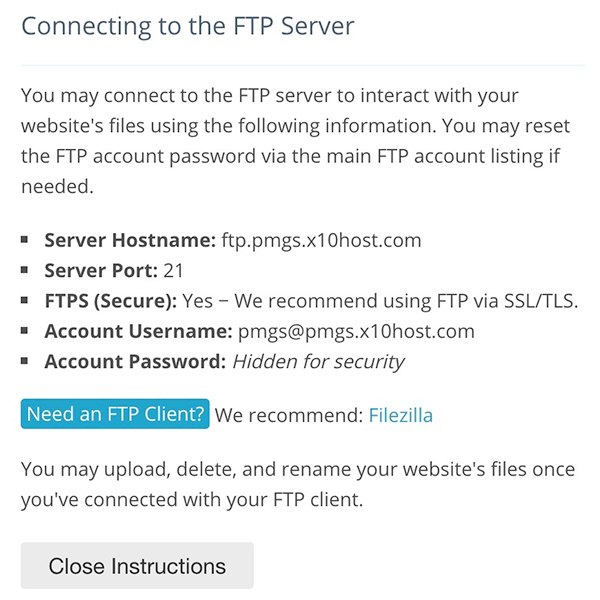
6. Once you've created a user, the FTP User screen will now show that user, and have an option for Connection Guide. Click that. You'll get the screen which shows your login details. Leave this info up and go to your FTP client.
7. Open your FTP Client. For this example, I'm using YummyFTP.
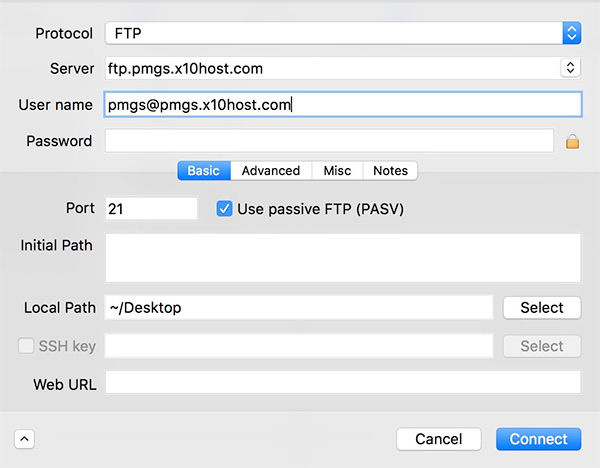
You first need to create a new connection. The location of this option will vary by program, but once you find it, it should have options similar to this. Enter the server, username, and password from Step 6. You may or may not need to enter the port number (I didn't). I also don't typically connect secure, so I left the protocol as FTP instead of FTP SSL/TLS.
8. Assuming you entered your settings correctly, you should now be connected to your server. If so, I recommend saving the connection as a bookmark (most clients support this feature). That way, you never have to reenter the connection info.
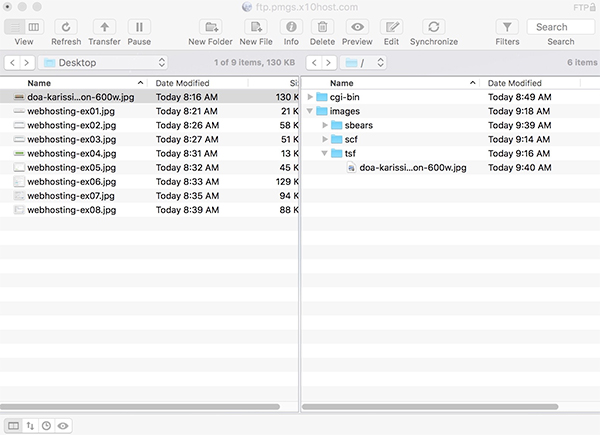
Assuming all went well, you should now see a screen similar to this. In my FTP client, the screen has my desktop on the left and the server file structure on the right. I can now drag and drop between them. For this example, I dragged an image from my desktop to my /images/tsf subfolder.
9. Now, back in the forum, I include the image by enclosing the full filepath in image tags. The filepath is your website name from Step 1, plus any subfolders, then the filename.
And voila!

Hope this helps. If you have any questions or run into any problems, just tag me.
1. Many of the services which are advertised as having free unlimited storage and bandwidth aren't actually free. They heave limited free services, but charge (usually $5-$15/month) for the unlimited plans. Poke around their websites and have a good look at the services offered before signing up for anything.
2. As with anything that's "free," services are subject to change (see Photobucket). If you truly want a stable, long-term solution, investing in a "premium " service (again, $5-$15/mo) will probably guarantee better long-term stability. I've had the same $11/mo unlimited service (Hostingmatters.com) for 15 years without a price increase or change in service.
3. Setup details will vary across platforms, so this is just a general guide. If you have any specific problems, let me know and I'll see what I can do to help.
4. I'm not affiliated with the hosting service demonstrated here, and offer no opinion as to their stability, reliability, adherence to "free," etc. Again, do your homework before signing up for anything. Perhaps when I get time I'll do some additional research and make a specific webhost recommendation, but for now, YMMV.
So let's get started.
Requirements
Most webhosting services will offer you two options for uploading images -- (1) web-based or (2) FTP (File Transfer Protocol).
1. If you're going to use web-based, no additional software is required as you can upload images within your browser.
2. If you're going to use FTP, you'll need an FTP client. On my Mac, I use YummyFTP or Fetch. For Windows, I've used FileZilla and WS_FTP. If you're going to be uploading lots of images, I recommend FTP. It's a million times faster and easier once you get past the initial setup.
Setting up a webhosting account
For this demo, I'll be using x10Hosting. Again, no endorsement implied. As far as I can tell, their free plan has unlimited storage. Not sure on the bandwidth, but even if it's limited, if all you're doing is hosting stamp images, you won't run into any bandwidth problems.
1. Create an account. The address you enter here will be the address of your "website". For this example, I used pmgs.x10host.com.

2. I can't show the intermediate steps to setting up an account for account security reasons, but once you're done, you should be at a Control panel that looks like this.

3. Web-based uploads: If you just want to upload images via your web browser, click on File Manager to get to this screen. The public_html folder in the tree at left is your root folder. This should always be your starting place. Within that folder, you can create subfolders if you'd like. For example, I created a subfolder called images, and because I keep my images from various stamp forums separate, under images I created additional subfolders for tsf, sbears, scf. For this example, I clicked the Upload button and uploaded an image to my /images/tsf subfolder.

If you're not going to connect via FTP, skip to Step 9.
4. FTP uploads: If you want to upload images via FTP, from the Control Panel, click on FTP Users. You'll get a screen with this button -- click it.

5. You'll then get the screen to add an FTP user. This allows you to create a username and password which you'll use to login through your FTP client. For this demo, I used pmgs@pmgs.x10host.com.

6. Once you've created a user, the FTP User screen will now show that user, and have an option for Connection Guide. Click that. You'll get the screen which shows your login details. Leave this info up and go to your FTP client.

7. Open your FTP Client. For this example, I'm using YummyFTP.
You first need to create a new connection. The location of this option will vary by program, but once you find it, it should have options similar to this. Enter the server, username, and password from Step 6. You may or may not need to enter the port number (I didn't). I also don't typically connect secure, so I left the protocol as FTP instead of FTP SSL/TLS.

8. Assuming you entered your settings correctly, you should now be connected to your server. If so, I recommend saving the connection as a bookmark (most clients support this feature). That way, you never have to reenter the connection info.
Assuming all went well, you should now see a screen similar to this. In my FTP client, the screen has my desktop on the left and the server file structure on the right. I can now drag and drop between them. For this example, I dragged an image from my desktop to my /images/tsf subfolder.

9. Now, back in the forum, I include the image by enclosing the full filepath in image tags. The filepath is your website name from Step 1, plus any subfolders, then the filename.
[img]http://pmgs.x10host.com/images/tsf/doa-karissimbi-provisionals-comparison-600w.jpg[/img]And voila!

Hope this helps. If you have any questions or run into any problems, just tag me.

